Back to blog
Article
How to Build a Bathroom in a Container House
Admin September 16, 2026
The construction of a bathroom in a container house requires systematic planning of foundational, drainage, waterproofing, electrical, and ventilation aspects. The specific steps are as follows:

1. Foundation Structure Treatment
- Floor Reinforcement and Corrosion Prevention: The bottom of the container is made of steel structure and needs to be thoroughly derusted and painted with anti-rust paint to prevent corrosion caused by long-term exposure to moisture. Then, a 20mm thick cement mortar leveling layer is laid to ensure a flat floor. Finally, a polymer waterproof membrane is applied or waterproof paint is brushed to form a double waterproof barrier. For higher durability, stainless steel drainage channels can be welded to the floor to direct water flow to designated areas.
- Sealing of Wall Panel and Floor Joints: Use neutral silicone structural adhesive to seal joints at corners, baseboards, etc., and press in waterproof adhesive strips to enhance sealing. Set up a water stop ridge 5-10cm high at the corners to prevent shower water from penetrating into the wall and causing mold or structural damage.
2. Drainage System Design
- Slope and Pipes: The slope of the drainage pipe should be no less than 2% to ensure rapid drainage of sewage. Choose PVC pipes with a diameter of more than 50mm and pre-install the pipes by drilling holes in the side walls of the container to avoid cutting and damaging the container structure later.
- Sewage Disposal Options: Prioritize connecting to the municipal sewer network; if conditions are limited, adopt a combination of an independent clean water tank and a sewage collection tank, or choose waterless sewage disposal equipment such as waterless packing toilets or foam-sealing toilets.
3. Waterproofing and Moisture-Proofing Techniques
- Container Waterproofing: Lay a waterproof membrane or brush waterproof paint at the bottom. The inner and outer surfaces of the wall and top steel plates should be coated with a waterproof layer, and all joints should be sealed with special sealant to prevent moisture from seeping in through gaps.
- Door and Window Sealing: Choose doors and windows with excellent waterproof performance and ensure that the sealing strips are intact and undamaged to prevent rain or moisture from entering.
4. Separate Layout of Electrical and Plumbing Systems
- Electrical Safety: All wires should be laid through pipes in the top area of the container and kept at least 30cm away from the water supply and drainage pipes to prevent short circuits caused by moisture. Use splash-proof sockets and waterproof switches to ensure electrical safety.
- Pipe Layout: Lay the water supply and drainage pipes along the bottom or side walls, reduce the number of elbows to lower the risk of blockage, and facilitate later maintenance.
5. Ventilation and Dehumidification Systems
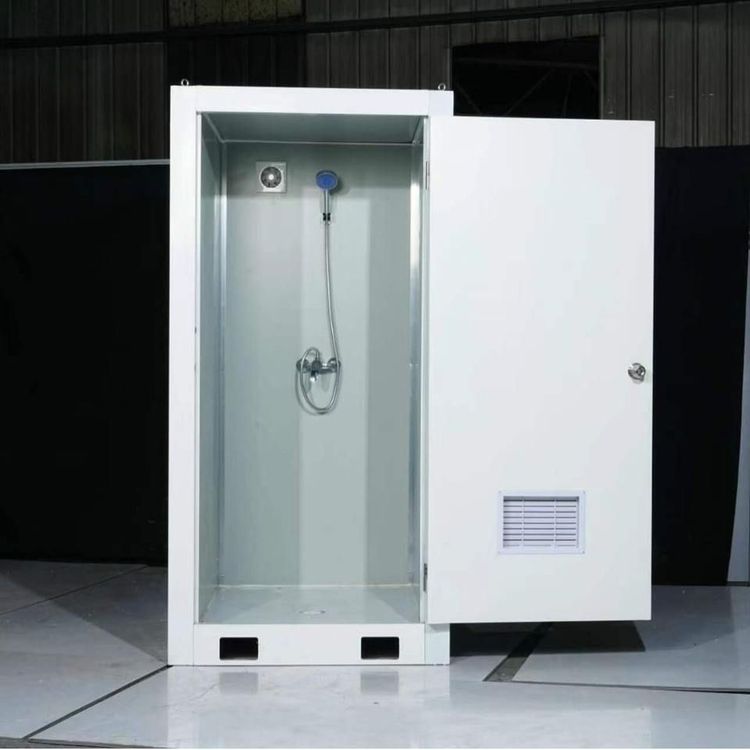
- Forced Ventilation: Install an exhaust fan or a fresh air system and reserve louvered vents on the walls to maintain air circulation and prevent stuffiness and humidity.
- Dehumidification Equipment: Equip with an active dehumidifier to reduce internal humidity and prevent corrosion of metal parts or mold growth.
6. Installation and Inspection of Sanitary Facilities
- Facility Selection: Install squat toilets, sit toilets, washbasins, etc., according to needs, ensuring they are firmly fixed and easy to use. Install effective floor drains inside to ensure smooth drainage.
- Safety and Hygiene Inspection: Regularly check the electrical circuits to prevent short circuits caused by moisture; regularly clean and disinfect to maintain a clean and hygienic environment.
Precautions: Avoid using second-hand containers directly without checking for original structural defects such as roof depressions and weld cracks; strengthen wind and heat insulation measures in special environments such as mountains.
Related